Project 3: Chat Server
You must write server and client programs to let users exchange messages. Each user will run the ChatClient program and connect to a shared ChatServer. The server will be responsible for forwarding incoming messages to all clients that are connected.
Typing a message and hitting send should transmit the desired message to the server, which will in turn forward the message to any other client that is connected. The server should also print something to its screen such as: “Joe: Hi I just joined” indicating that a message was sent by the user Joe.
Users should be able to change their name by sending the message “/name newName”. This will cause all subsequent messages to be sent from the new name.
For the full description, read the README included with the starter repo.
Use this link to setup your repository.
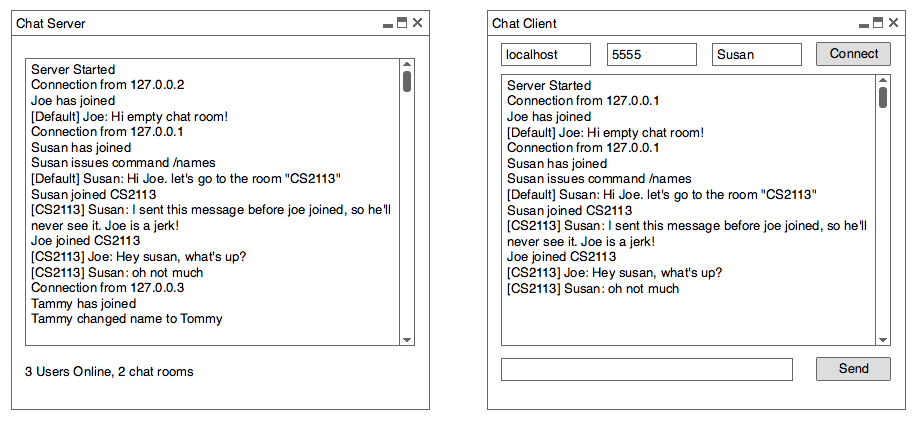
Here is a slightly more advanced mockup of the GUI. You should have similar behavior where the server displays all messages that have ever been received and each client can see whatever messages have arrived since they connected to the system. You do not need to support multiple “rooms” within your server (this is shown in the image with the Default and CS2113 tags).
Submission and Grading
The final project is due Tuesday December 11th at 11:59PM.
You will be graded as follows:
  - 25 points: Clients send and receive
  - 35 points: Server handles multiple clients
  - 10 points: Fully functional GUI
  - 10 points: Change name functionality
  - 20 points: OOP Design, comments, coding style, and polish
  - Total: 100 points
Tips
For any project of this size you need to break it down into pieces. I suggest the following:
Phase 0: Be sure you understand networking and inner classes
This project relies on concepts covered in Java Modules 5, 6, and 7, but you can get started having just been through 5 (GUIs) and 6 (Networking).
Be sure you understand:
- How to handle events related to GUIs such as clicking a button.
- How to create a socket and connect from a client to a server.
- How to send and receive strings over a socket.
- How to use Inner Classes to encapsulate objects inside another class.
Given this knowledge, read through the code you have been provided and run it to be sure it works correctly on your machine. You should be able to have the client connect to the server, and you should be able to correctly send messages from the client and have them displayed on the server.
Students often try to implement unnecessary features because they don’t realize the starter code already does much of what they need!
Phase 1: Single Client
Start by getting a single client to fully work. That means:
- Make the server send a message back to the client so the client will update its display. Eventually you will want the server to track multiple clients and send to all of them, but that requires Threading (covered in module 7). To begin with, get the server to echo the incoming message back to the single client that is connected to it.
- The client needs to call
readLine()in order to receive a message from the server. Think about where to put that in the current (non-threaded) code. Keep in mind that a call toreadLine()will block the program, preventing it from doing anything else, so you should only read when you are sure a message is incoming! - Getting up to this point is sufficient preparation for Lab on 11/26.
- Next, add support for the Client to change its name. Think about how you will implement this. The server should show a message (and return a confirmation message) when the client changes its name.
- Test what happens when you try to run a second copy of the Client while the first is active.
Phase 2: Threaded Server
Once you have finished Module 7 you will know how to add threading. This lets your server multi-task:
- The server from Phase 1 can only have a single client connected to it at a time. That’s not very social! Be sure you understand why.
- Modify the server so that it creates a new thread for each client that connects. Think about what information you need for each thread to be able to communicate with the client it is working with. For simplicity, retain the logic so that when a client sends a message, that message is only sent back to the same client who sent it. Test your program to verify that you can now support multiple clients–the server should display messages from all clients, but each client will only be receiving its own messages back from the server.
- Getting up to this point is sufficient preparation for Lab on 12/3.
Phase 3: Threaded Client
The problem with the current client is that it only has a single thread, so it can’t always be waiting around listening for messages from the server. To fix that:
- Make your client multi-threaded. Think about what the second thread should do and what information it needs.
- Modify the server so that after receiving a message from one client, it will respond by sending that message back to all currently connected clients. Your multi-threaded server won’t need more threads to do this, but each of the threads might need more information than they currently do.
Phase 4: Finalize and Polish
At this point, you should have most of the features complete! Do some final testing to be sure everything works correctly. Go through your code and remove old commented out sections. Be sure everything is nicely formatted and commented. Submit and get ready for finals!